Regret installing Windows 11? Here's how to go back to Windows 10

Windows 11 is currently rolling out to users with compatible hardware, but if you don't want to wait you can jump the queue. You can even install it on PCs without the TPM 2.0 requirement using this hack. Although it’s early days, a number of users have reported problems with the OS, which is to be expected.
If you upgrade to Windows 11 and encounter problems -- or decide it’s simply not for you -- you might want to go back to Windows 10, and wait until the new OS is a bit less buggy. The process is straightforward enough, although there are some downsides to be aware of.
SEE ALSO: How to get Windows 11 on your PC today
To rollback Windows 11, go to Start > Settings and click on Windows Update.
Click on Advanced options and then click on Recovery.
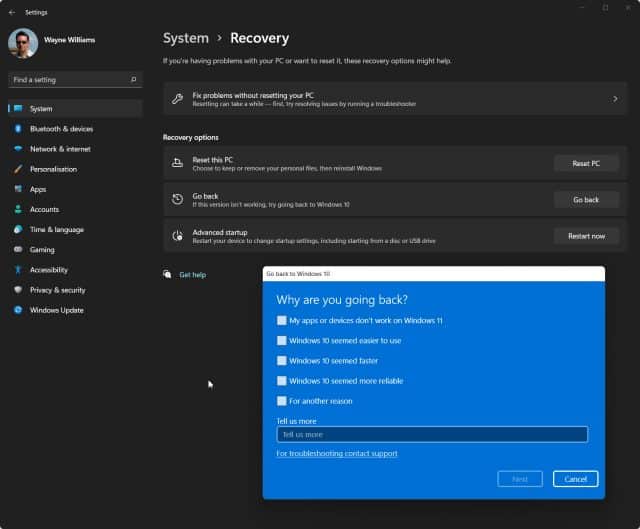
Under Recovery options you’ll see Go back. Click the Go back button next to this.
Provided you haven’t yet cleared up all the space used by the update, and you’re within the time limit -- you only have 10 days to revert your system back to Windows 10 -- the rollback process will start.
You’ll now be asked why you are going back to Windows 10.

You need to select a reason for the Next button to appear, and can also opt to tell Microsoft more about your reasons if you wish.
Before you do go back to Windows 10 you’ll have the option to check for updates, just in case the problem(s) you’re encountering have since been fixed.
Bear in mind, if you do revert to a previous build you may need to reinstall some apps and programs, and you will lose any changes you made to Settings after the upgrade to Windows 11. You’ll also be advised to backup your files as a precaution, and will be informed that if you used a password to sign in to Windows 10 you’ll need it to hand.
If you’re sure you want to remove Windows 11, click on the Go back to Windows 10 button and the rollback will begin. Just sit back and wait.
Photo Credit: fizkes/Shutterstock
