How to set up Outlook.com with IMAP in OS X Mail

Despite pitching Exchange ActiveSync as the better protocol, Microsoft has turned the lights on IMAP support for its Outlook.com consumer-oriented email service. The newly added protocol brings along with it a slew of benefits, including support from services like Unroll.me, and an improved user experience for those who connect to Outlook.com from a number of third-party clients such as the Mail app from OS X.
Setting up Outlook.com, using the IMAP protocol, in the OS X Mail app is not a straightforward process, as either the needed configuration settings are missing or the software automatically chooses POP as the unchangeable, de-facto protocol. A bit of trickery might be involved. Here is what you need to know.
First, let's take a look at the configuration settings. In order to use Outlook.com with IMAP, the following settings must be used during the setup process in the email client (obviously, you have to remove the quotes):
For incoming connections:
- Server address: "imap-mail.outlook.com"
- Server port: "993"
- Encryption type: "SSL"
For outgoing connections:
- Server address: "smtp-mail.outlook.com"
- Server port: "587"
- Encryption type: "TLS" ("SSL" can be used if TLS is not an option)
Second, if you have two-factor authentication enabled for your Outlook.com account then you will have to create an application-specific password to use during the setup process (your normal password will not work in this case). You will have to either keep the window which displays it open or write it down somewhere it's easily accessible (I prefer the former option, for security purposes), so you can type it in or paste it when needed. Here's how to create an application-specific password:
- Open the Outlook.com Account Settings
- Open Edit security info
- Under App passwords, open Create a new app password
Outlook.com will then automatically create a new application-specific password for you to use to log in to your account. Remember to heed the aforementioned advice.
Depending on the OS X iteration that runs on your Mac (or, Hackintosh if you're doing this on a PC), the Mail app will either let you set up Outlook.com with IMAP directly, at which point you will only have to use the aforementioned configuration settings to add the account (the general guidelines will be presented below), or refuse to use anything but POP during the process.
Here's how to figure that out. Open the Mail app, go to File, then click on Add Account. Type in your Outlook.com email address and password (or, application-specific password for those who have two-factor authentication enabled) and click Continue.
If you can choose which protocol -- or, account type -- to use (IMAP or POP in this case), then you should carry on with the process and type in the configuration settings as needed. If the Mail app says that the account type is "outlook.com POP" and does not let you change it then you will have to click Go back and do the following:
- Use a bogus email address and password (like [email protected] and "fictivepassword", respectively).
- Under Account Type, select IMAP.
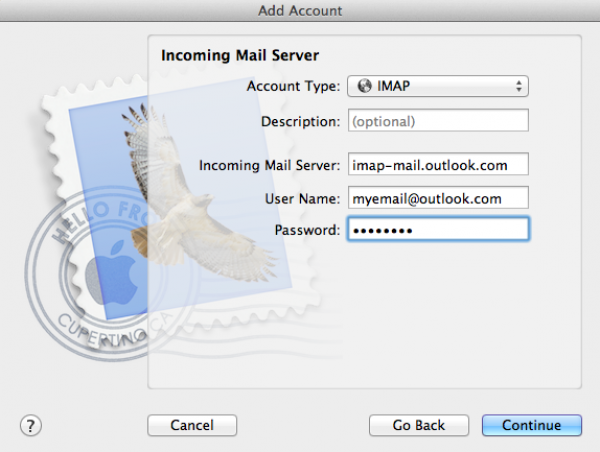
- Under Incoming Mail Server, type in "imap-mail.outlook.com"
- Under User Name, type in your Outlook.com email address.
- Under Password, type in your Outlook.com password, or application-specific password.
It should look like this (see image below). Then, click Continue.

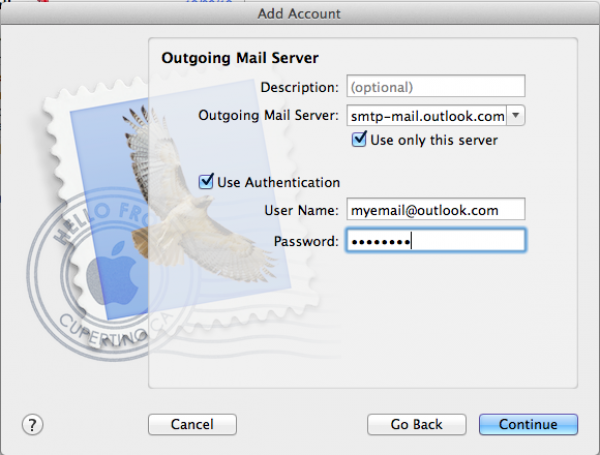
- Under Outgoing Mail Server, type in "smtp-mail.outlook.com"
- Tick Use only this server
- Tick Use Authentication
- Under User Name, type in your Outlook.com email address
- Under Password, type in your Outlook.com password, or application-specific password
Here's how it should look like (see image below). Then click Continue.

Click Create. The OS X Mail app is now using IMAP to connect to your Outlook.com account. But you still have two more things to do. You have to change the bogus email address and password, that you used in the beginning of this process, to your real Outlook.com account name and a description of your choosing (if you have followed my advice to the letter, then you have "Fictiveemail" as the description).
To do that you have to, from the Mail app, click on Mail, then Preferences and select the account your just added. And, use the real Outlook.com account name under Email Address and type in a description for this account (like, "Outlook.com").
Even though I have yet to test this, it's safe to assume that you can use the same IMAP configuration settings with a Hotmail or Live username handle (like [email protected] or [email protected]).
