How to automatically mount a network drive on Mac OS X

To quickly and easily access a network drive from your Mac you can configure OS X to automatically mount the volume after booting up. That way, after you turn on or restart your Mac, you will be able to get to your files in no time. But, how can you do that?
While it is very easy to access the network drive, figuring out how to set up OS X to automatically mount it is not. That is because there is no magic button to click on in the volume's settings or an obvious option to enable in System Preferences. So, where does that leave you?
The fix is actually very simple: you only need to add the volume as a startup item for your user. When set up as such, after you log in, OS X will open and, as a result, mount the network drive for you. Sounds logical, doesn't it?
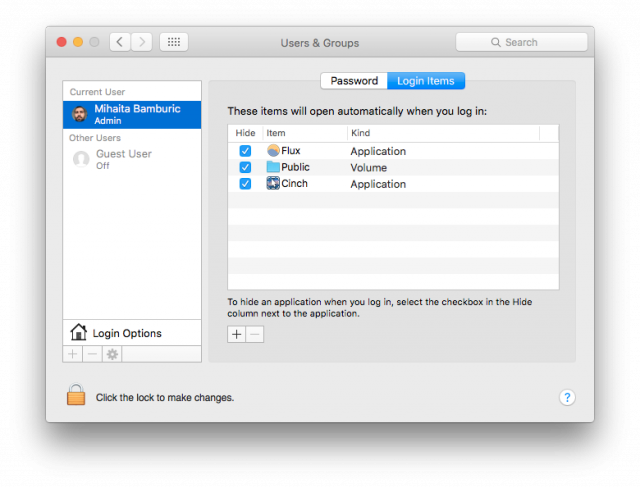
What you need to do is open System Preferences, go the the User & Groups menu, switch to the Login Items tab and click on the + button to add the network drive in question. After selecting the volume, hit "Add" and it will show up in the list.
As you may have noticed, there is a box that you can tick in the Hide column. With that option enabled OS X will not display a Finder window after connecting to the network drive. In my case, however, it seems to have no effect, though it works for the apps that open at login.
To make changes to the list of startup or login items you may have to hit the lock bottom left corner of the window. If that's the case, enter your user password to do it, but do not forget to lock it back again after you are done. Click on the lock again to do that.

The Public volume on my Seagate Central NAS is set to automatically mount after my MacBook Air boots up
You can use this method to automatically mount all of your network drives. In case you have certain apps that depend on the connection being established before they open (like a BitTorrent client that downloads to a NAS unit) make sure that the volumes are higher up in the list so that OS X establishes a connection to them beforehand.
