How to monitor Registry changes
 Configuring and optimizing a PC takes some thought, a lot of experience and, usually, a great deal of time. So it’s all the more annoying if your carefully tuned settings are altered by something else, without your permission.
Sometimes you’ll have an idea when this happens. You might install something, carry out a particular action, and the setting changes. If you can’t see when or why a change happens, that could be even worse, especially if it’s something security-related -- perhaps malware was involved. Whatever your situation, you need to investigate further, and a good first step is to monitor the Registry, find out more about what’s being changed, and when. The best way of doing this depends on your precise needs, but here are five possible options.
1. BgInfo
The simplest form of Registry key monitoring is just to display its value occasionally. This won’t give you a lot of detail, but you’ll at least get an idea of when a setting has changed, and can then investigate in more detail.
Sysinternals’ BgInfo is a tiny tool which can display a vast amount of system information -- and whatever Registry values you like -- on your desktop wallpaper. It’s very lightweight, no background monitoring processes to worry about, but you’ll still get a warning (eventually) when something changes.
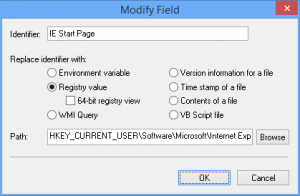
Launch BgInfo, clear all the current values in the editing area, and select Custom > New > Registry Value.
Type IE Start Page in the Identifier box.

Enter HKEY_CURRENT_USER\Software\Microsoft\Internet Explorer\Main\Start Page in the Path box, and click OK > OK.
Select IE Start Page in the "Fields" box, click Add > OK, and you should now see your current Internet Explorer start page displayed on the desktop.
If the Registry value changes then you’ll see the new URL when you reboot, or BgInfo runs again, perhaps giving you an early chance to spot unauthorized changes.
2. REG
Displaying Registry values can be useful, but logging them to a file makes it easier to analyze later, and is also a better choice for recording what’s happening on someone else’s PC.
Basic logging requires nothing more than a batch file. Here’s a simple example.
@echo off
date /t >> report.txt
time /t >> report.txt
reg query "hkcu\Software\Microsoft\Internet Explorer\Main" /v "Start Page" >> report.txt
This hides the batch file prompts, adds the current date and time to the end of the "report.txt" file, and then uses the standard reg.exe command to save the current IE home page to the same log. (Microsoft’s guide to reg.exe syntax tells you more about what you can do.)
Copy this into your Startup folder, maybe run it as a scheduled task, and over time you’ll build a record of the home page history. If malware (or another user) changes it, you’ll see approximately when that happened, and can investigate further.
3. Registry auditing
Windows auditing is a powerful feature which can track many system events, including changes to Registry keys.
To enable Registry auditing, open an elevated command line (right-click cmd.exe and select "Run as administrator") and enter the command:
auditpol /set /subcategory:”Registry” /success:enable

Launch REGEDIT, and browse to HKEY_LOCAL_MACHINE\SOFTWARE\Microsoft\Internet Explorer\Main (or any other key you’d like to monitor).
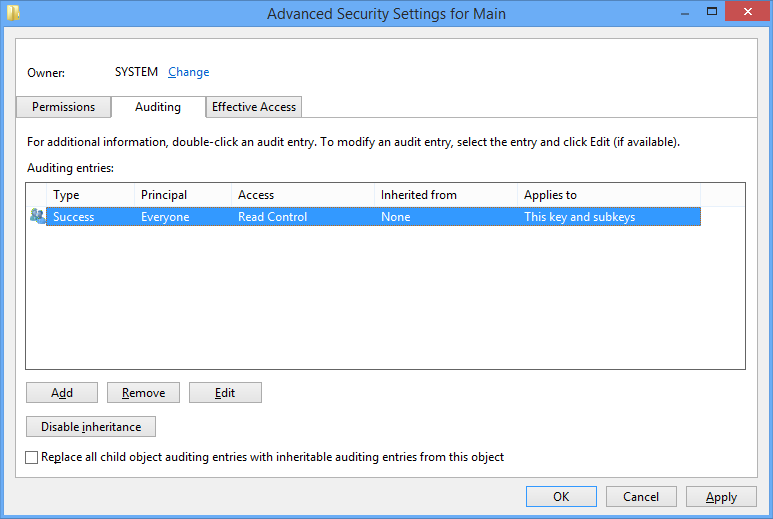
Right-click the key in the left-hand pane, and select Permissions > Advanced.
Click the Auditing tab and select Add.
Click "Select a principal", type "Everyone" in the "Enter the object name" box and click OK.
Choose whether you want auditing to apply to this keys, or subkeys too, then click OK to close all open dialogs.
To see how this works with our example key, change your IE home page to another site, then restore it.
Launch Event Viewer, and browse to Event Viewer > Windows Logs > Security.
You should see "Audit Success" events recording the date and time of your tweaks, and clicking these displays the name of the Registry key accessed, and the process responsible for the edit.
When you’ve finished, remove any audit entries you’ve created (right-click a Registry key > Permissions > Advanced > Auditing > select > Remove), and repeat the auditpol command above, replacing "enable" with "disable", to turn off auditing.
4. Process Monitor
Logging Registry changes is a simple technique, very unobtrusive, great if you just need to get a basic idea of what’s happening on someone else’s PC.
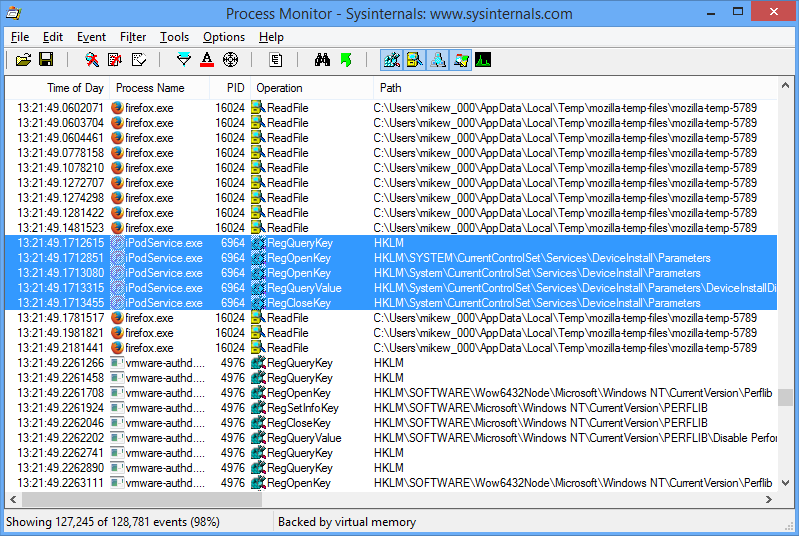
But if you’re working on your own system, there’s no substitute for Process Monitor, a powerful tool which displays Registry changes, file accesses, process creations and more, all in real time.

If you’re new to the package then the sheer volume of data can be a problem, but adding a filter or two should make life easier.
Click Filter > Filter > Add.
Select "Path" in the first list box, "contains" in the second.
Enter all or a part of the Registry path you’re monitoring in the text box. We’ll use Software\Microsoft\Internet Explorer\Main\Start Page to keep up with our example.
Select "include" in the final list box, then Add, and we’re done.
Turn on event capturing if it’s not running already (File > Capture Events), and try changing Internet Explorer’s home page via IE itself, Regedit and any other convenient tool.
In each case Process Monitor displays any reads or writes to your Registry key, along with the date, time, new value, and the process making this happen.
We’ve kept this really simple, just about monitoring a single key, but Process Monitor does much more. You could try widening filters a little (use Software\Microsoft\Internet Explorer to monitor all IE changes). Adding more filters. Or remove them all, capture everything, and use the various highlighting and search features to find what you need.
If you need more troubleshooting power, Process Monitor is a great choice. Go explore.
5. Regshot
So far we’ve assumed you know which Registry settings you’d like to monitor, but that’s not always the case.
Sometimes you might just want to see everything that’s changed recently, or after carrying out some specific task (installing a program).

Sounds like a complex task, but the freeware Regshot makes it all very simple.
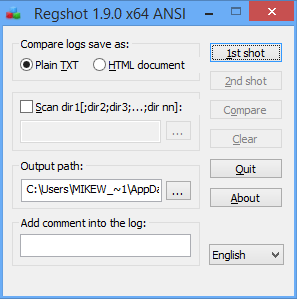
Launch the program and click 1st shot > Shot to take a snapshot of the Registry as it is now (use 1st shot > Shot and save if you’d like to save the snapshot for use in future sessions).
Now install a program, carry out some action, or just wait for a while, until you think some Registry changes have been made.
If you’ve closed Regshot, click 1st shot > Load to reload the snapshot you created earlier.
Click 2nd shot > Shot to take a second snapshot.
Click "Compare" and Regshot scans both files, looking for the differences. This takes quite some time and Regshot’s interface won’t respond while it’s working, but be patient, it’ll finish eventually.
When the job is done, Regshot produces a plain text report listing keys and values added, deleted or modified. This may be quite lengthy, because Windows and some applications are changing Registry keys all the time, but browse it carefully and you’ll still have a vast amount of troubleshooting data to explore.
