
Multitasking made easy with Windows Virtual Desktops and Snap Layouts
When used correctly, Virtual Desktops, first introduced in Windows 10 and then refined in Windows 11, offer a handy way to manage multiple workflows. They let you create separate, dedicated workspaces within the OS, keeping things organized and clutter free. This is especially useful for those who juggle work, personal projects, and entertainment, as it allows for smooth switching between different activities without losing track of anything. By assigning specific apps and windows to different desktops, you can stay focused and organized across various tasks.
In Windows 11, Microsoft introduced Snap Layouts, enhancing multitasking by providing predefined grid options for arranging windows. This feature expands on the simpler Snap Assist functionality from Windows 10 and when used with Virtual Desktops can keep each workspace neat and orderly.
SEE ALSO: Windows 12.1 is everything Windows 11 should be -- and the Microsoft operating system we need!
Why use Virtual Desktops?
- Improved focus and productivity -- By separating work from personal apps, you can minimize distractions. Keep work files and meetings on one desktop while social media or personal documents stay on another, allowing you to concentrate better.
- Clutter-free workspaces -- Virtual Desktops help reduce desktop clutter by allowing you to neatly categorize tasks. Each desktop can be dedicated to specific projects, making your work environment more manageable.
- Efficient multitasking -- You can easily switch between tasks without losing track of open apps. For example, if you're working on a project and need a break, switch to another desktop for a distraction-free pause, then return to work effortlessly.
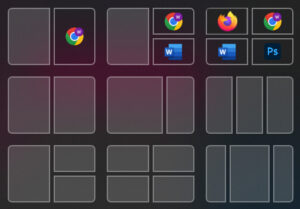
Snap Layouts
Snap Layouts, a Windows 11 feature, allow you to organize your open windows by snapping them into predefined grids. It’s particularly useful for large screens or multiple monitors, giving you control over how your apps are displayed. For example, you can snap your web browser and notes app side by side on your “Work” desktop while keeping other desktops focused on entirely different tasks.
Get started with Virtual Desktops and Snap Layouts
Setting up Virtual Desktops:
- Windows 10 and 11: Press Windows Key + Tab to open Task View, then click "New Desktop."
- You can also click the Virtual Desktops button on the taskbar.
- Switch between desktops by pressing Windows Key + Ctrl + Left/Right Arrow.
Using Snap Layouts:
- Hover over the maximize button on any window, and Windows 11 will present Snap Layout options. Choose how you'd like to organize your open windows, such as splitting them side by side.
- You can also use Windows Key + Arrow Keys to snap windows manually into place.
Tips for organizing with Virtual Desktops and Snap Layouts
- Label your desktops -- Give each desktop a specific purpose, such as "Work," "Personal," or "Projects," to make navigation more intuitive.
- Personalize each desktop -- Assign different wallpapers to each Virtual Desktop so you can see at a glance which workspace you're in.
- Combine with Snap Layouts -- On each Virtual Desktop, you can use Snap Layouts to arrange your apps neatly. For example, in your "Work" desktop, you can snap your email, browser, and documents into a three-panel layout for better multitasking.
Virtual Desktops and Snap Layouts make it easy to separate your work and personal life, especially for remote workers. They allow you to focus on specific tasks, declutter your desktop, and boost productivity. Once you start using these features, you’ll wonder how you ever managed without them.
Image Credit: Pandora1 / Dreamstime.com