How to install Android 4.4 KitKat on Nexus 4, 5, 7 and 10

After launching Android 4.4 KitKat alongside the Nexus 5, Google released the latest version of the mobile OS for the Nexus 4, Nexus 7 and Nexus 10. The roll-out of the OTA upgrade kicked off on November 13 and the factory images arrived a couple of days later. Since I have already explained how to use the OTA files to get KitKat up and running, in this article I will show you how to do the same by leveraging the factory images.
Aside from allowing users to install Android 4.4, the KitKat factory images also come in handy for those who wish to upgrade, return their Nexus device to stock before selling it, and install various bits (the radios, the bootloader, etc.) to use with custom Android distributions. As you can tell, the factory images have a broader scope and, therefore, I will also cover the other most important ways you can benefit.
Backup
Before going any further, you should perform a backup of the data on your Nexus device. Nearly every outcome presented in this guide involves removing personal content, so it's best to err on the side of caution.
Requirements
Regardless of why or how you want to install Android 4.4 KitKat (or use the factory images), you will need a couple of things to get started:
- The Android SDK Tools, that you can download from the Google Developers site;
- The factory image for your Nexus devices, that you can also download from the Google Developers site;
- A program that can handle archived files, like 7-Zip or WinRAR (either one is fine; links to the official download pages are included).
I recommend you to store the downloaded factory image in a folder that is easy to access (as close as possible to the root of the drive). For the purpose of this guide I will use a folder named Root on the C drive (the default drive for Windows installs). The path for the folder, in this case, is C:\Root.
Preparations
Now that the aforementioned files are downloaded on your PC, you will now have to install the archiver of choice and the Android SDK Tools. After the latter is installed, open the Android SDK Tools Manager and select the following two items for download:
- Android SDK Platform-tools -- it contains essential tools for the process;
- Google USB Drivers -- it contains the right drivers for your Nexus device.
The two are needed to ensure that the PC is able to communicate with your Nexus device, and handle the files needed for the process. I advise you to only use the files provided by Google (and not resort to ones from third-parties) as those are always up-to-date.
To keep things as simple as possible going forward, go to the folder where Android SDK Platform-tools is installed (in my case its location is C:\Program Files (x86)\Android\android-sdk\platform-tools) and copy the following files to the Root folder:
- AdbWinApi.dll;
- AdbWinUsbApi.dll;
- fastboot.exe.
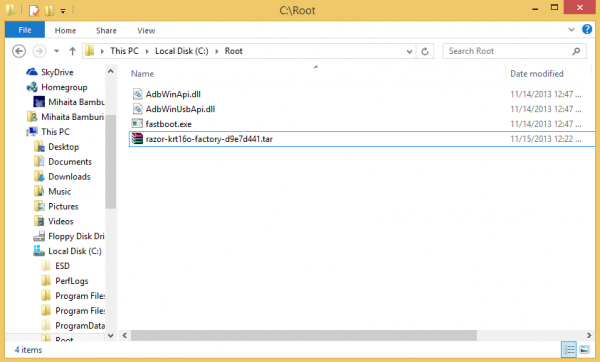
For verification purposes, if you have followed these steps correctly you will have the following files in the Root folder (the picture below shows the folder items for the 2013 Wi-Fi Nexus 7):
- AdbWinApi.dll;
- AdbWinUsbApi.dll;
- fastboot.exe;
- The Android 4.4 factory image for your Nexus device.

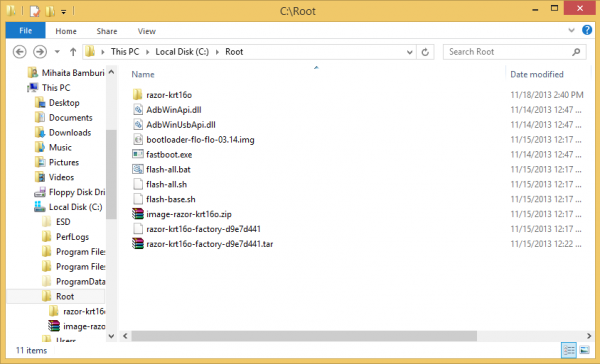
You will now have to extract the contents of the Android 4.4 factory image to the Root folder. A file without any extension will show up; open it (use the Open With option in the context menu) with the archiver (look for the executable in the C:\Program Files or C:\Program Files (x86) folder) and also extract its contents to the Root folder. A new folder will be created inside Root (in my case its name is razor-krt16o); open it and copy all the contents inside it to the Root folder. Finally, the Root folder will look like in the image below.

The number of files inside the Root folder varies depending on the Nexus device. Factory images for the Wi-Fi Nexus 7 and Nexus 10 yield the same number as shown above whereas the factory images for the Nexus 4, Nexus 5 and 3G/4G Nexus 7 will add one extra (the cellular radio).
You will now have to install the right driver for your Nexus device. Follow the next steps for this process:
- After connecting the device to the PC, power the Nexus off.
- Turn on your device in fastboot mode; the key combination for your device is either volume down + power button (2012 and 2013 Nexus 7 and Nexus 4) or volume up + volume down + power button (Nexus 5 and Nexus 10).
- From Device Manager (Computer -> Properties -> Device Manager) identify your device (it will show up with a yellow exclamation mark icon).
- Right click on it, select Update Driver Software and then select Browse my computer for driver software.
- Select Let me pick from a list of device drivers on my computer.
- From Have Disk... option manually install the android_winusb.inf driver (in my case, its location is C:\Program Files (x86)\Android\android-sdk\extras\google\usb_driver). Accept any prompts you may receive.
- Select the Android ADB Interface option when presented. Accept any prompts you may receive.
Final Check
In order to determine whether your Nexus device is ready for the process, you have to enter fastboot mode, open a command prompt window and test if it can communicate with your PC.
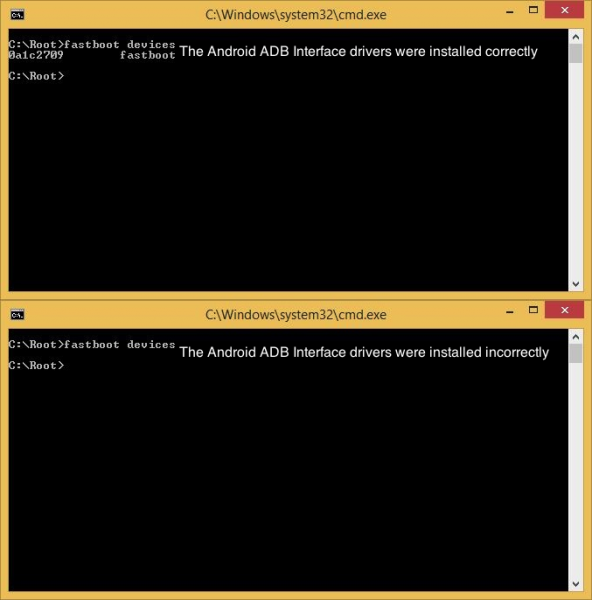
To perform the test, go to the Root folder, right-click inside it while pressing the Shift key and select Open command window here. Afterwards, type the fastboot devices command and press the Enter key.
If your device is listed you can continue as the drivers were installed correctly; otherwise you have to repeat the necessary steps as the drivers were installed incorrectly. The image below depicts both cases, with the former shown on top.

Clean Install/Return to Stock
In this scenario all your personal data will be erased from the device, so make sure you have taken my advice to perform a backup. Here is what you have to do to initiate a clean install or return to stock:
- Connect your Nexus device to the PC in fastboot mode.
- Open a command prompt in the Root folder.
- Use the fastboot oem unlock command to unlock the bootloader. A prompt will show up on your Nexus device; use the volume keys to select Yes and press the power button to validate. This command will erase all personal data from the device.
- Use the flash-all.bat command to perform a clean install of Android 4.4 KitKat.
- Optional: use the fastboot oem lock command while in fastboot mode to re-lock the bootloader. This will not alter the state of the data stored on the device.
Upgrade
Using this method you can upgrade to Android 4.4 KitKat and keep all personal data on the device. There is one major caveat, though -- the bootloader had to be unlocked before any personal was stored on the Nexus smartphone or tablet. Here is what you have to do in order to initiate the upgrade process:
- Using Notepad, open the flash-all.bat file (or, right click on it and select Edit). To avoid any issues make sure that your Nexus device is disconnected from the PC beforehand.
- Identify the fastboot -w update sequence.
- Remove the -w so it now appears as fastboot update. Save the file.
- Connect your Nexus device to the PC in fastboot mode.
- Open the flash-all.bat file in the Root folder (or, you can use the flash-all.bat command in a command prompt window opened in the Root folder).
Install Individual Images
If you are looking to keep the current software (either stock or custom) but wish to install individual components from the Android 4.4 factory image -- the list usually includes just the bootloader, kernel, radio and recovery (which is what I'll discuss below) -- you have to go through the following steps:
- Connect the Nexus device to the PC in fastboot mode.
- Open a command prompt window in the Root folder.
- Use the fastboot flash bootloader/boot/radio/recovery file_name command to install the bootloader, kernel, radio or recovery image (use the matching command, like fastboot flash bootloader bootloader.img).
- Use the fastboot reboot-bootloader command to reboot the device in fastboot mode. This is only required for the bootloader and radio installs (in both cases the same command applies).
You can now restore the backed up data and enjoy your Nexus device running Android 4.4 KitKat.
Update: The story was updated to remove section about the lack of the Nexus 10 factory image (the file can be downloaded from said page).