How to upgrade Nexus 7 and 10 to Android 4.4 KitKat

As expected, Google has started to roll out Android 4.4 KitKat to its Nexus tablet lineup. At the moment, the software upgrade is only heading to the Wi-Fi versions of the Nexus 7 and the Nexus 10, but is slated to reach the cellular models of the smaller tablet too in the upcoming period, as well as the Nexus 4.
The upgrade may be rolling out to compatible tablets as we speak but it will take some time to reach all Nexus 7 and Nexus 10 devices. Luckily, you do not have to wait for the notification to install Android 4.4, as you can get KitKat up and running right now without losing any of your apps and settings or resorting to the modding trickery of loading a custom ROM.
The files that you will be using to upgrade the Nexus 7 and/or Nexus 10 to Android 4.4 KitKat come directly from Google. As a result, this guide only discusses the Wi-Fi models specifically. Why? Because, as I have mentioned in the first paragraph, these are the sole models that have received the search giant's blessing at the moment.
You can, however, use this guide to upgrade all compatible Nexus devices (including the Nexus 4 and 3G/4G LTE Nexus 7) to Android 4.4 KitKat once the corresponding OTA files are available, by following the same steps.
Requirements
To upgrade to Android 4.4 KitKat you will need the following files:
- The Android SDK Tools, that you can download from Google Developers.
- The OTA upgrade file for your device. Select the corresponding file below for your Nexus device.
To keep things as simple as possible, store the corresponding OTA file in a folder that is easy to access from the command line (more on that later). I will use a folder named Root on the C:\ drive in Windows. The path of this folder is C:\Root.
Preparing For the Upgrade
Before you are able to perform the upgrade, you will need to have the necessary tools and drivers downloaded on your PC. To do this, install the Android SDK Tools, then open the Android SDK Manager and select the following items for download:
- Android SDK Platform-tools -- it contains the required tools for the upgrade process
- Google USB Driver -- it contains the necessary drivers for the Nexus device
From the folder where Android SDK Platform-tools is installed (in my case it is C:\Program Files (x86)\Android\android-sdk\platform-tools) copy the following files to the previously created Root folder:
- adb.exe
- AdbWinApi.dll
- AdbWinUsbApi.dll
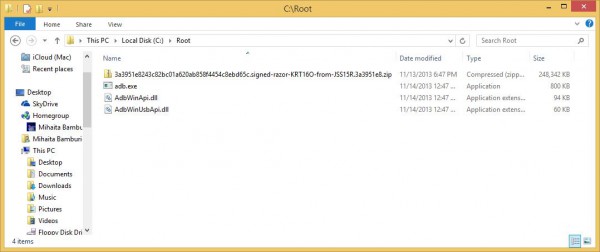
If you have followed all the steps so far, in the Root folder you will have the following files:
- adb.exe;
- AdbWinApi.dll;
- AdbWinUsbApi.dll;
- The OTA file (the picture below shows the 2013 Wi-Fi Nexus 7 version).

For convenience, you can change the lengthy name of the OTA file to something shorter, like OTA.zip. For the purpose of this guide, this is the name that I will use where necessary.
You will now have to install the correct drivers, so the PC can communicate with your Nexus device. To do so, follow the next steps:
- After connecting the device to the PC, power your Nexus off.
- Turn on your device in fastboot mode; the exact button combination for your Nexus is listed here. If you do not know the product name, please look for my explanation in the comments section.
- From Device Manager (Computer -> Properties -> Device Manager) identify your device (it will show up with a question mark on the icon).
- Right click on it, select Update Driver Software and then select Browse my computer for driver software.
- Select Let me pick from a list of device drivers on my computer.
- From Have Disk... option manually install the android_winusb.inf driver (in my case, its location is C:\Program Files (x86)\Android\android-sdk\extras\google\usb_driver). Accept any prompts you may receive.
- Select the Android ADB Interface option when presented. Accept any prompts you may receive.
Upgrading to Android 4.4 KitKat
To kick off the process you have to open a command prompt window (press Windows Key + R, type cmd in the box and press the enter key) and go to the Root folder. To do this, type the cd C:\Root command. The command prompt window will show the current folder as C:\Root>, if you have followed these instructions as presented.
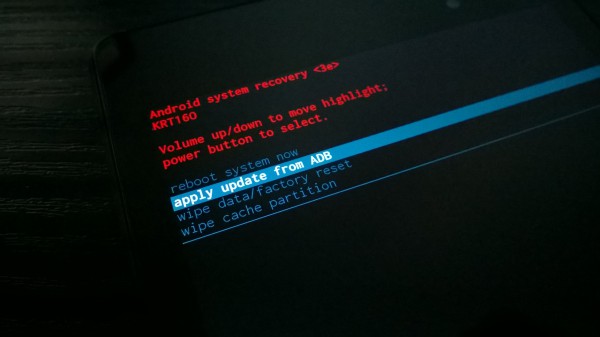
With the Nexus powered on in fastboot mode and connected to the PC, use the volume keys to select Recovery Mode on the device and press the power key to enter it. Afterwards, press the power button and immediately after the volume up key. The Nexus will now show you a menu with a number of options, including apply update from ADB. Select it by using the volume keys; press the power button afterwards.

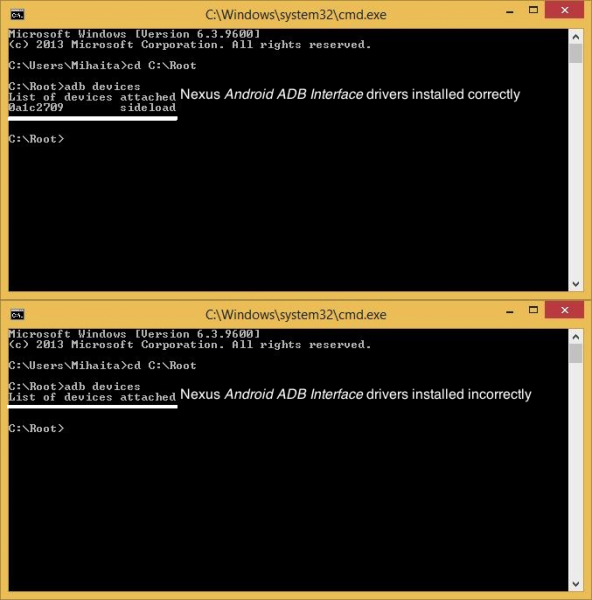
Now verify if the setup is working as it should. In the command prompt window, type adb devices. Your device should be listed and you can continue; if it is not shown then you have the drivers installed incorrectly (or the wrong option selected while installing them). The image below shows both cases.

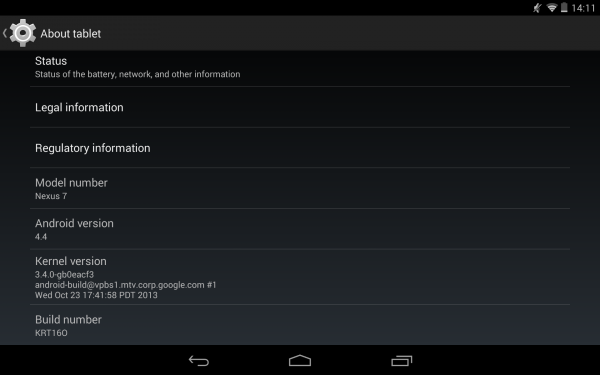
Finally, to upgrade to Android 4.4 KitKat, you simply have to type the adb sideload OTA.zip command and your Nexus device will take things over from there. In a couple of minutes, the latest version of the popular mobile OS will be up and running. Here's a screenshot showing Android 4.4 KitKat running on my Nexus 7, after upgrading using the OTA file.

Update: This post was updated to include more information in the section that describes how to install the correct USB (ADB) drivers. Further information is available in the comments section, as said in the article.
Photo Credit: Mihaita Bamburic
