How to send large files by email

Businesses aspire to get past survival mode and shift into growth and innovation. So, it’s important to work through some of the process bottlenecks that happen on a regular basis to free up time to explore new concepts and strategies.
Since a big part of growth is being able to share great content, this post is about how to resolve issues around file sharing via email that hold up displaying your work, or creating design assets.
Once you can store and share your work, you can get busy making an impact with social media, blog posts, and presentations.
The Four Ways to Send Large Files via Email
Most email providers allow you to attach 20 to 25 megabytes of data, whether it’s documents, images, or audio. If you find that your attachment exceeds the permitted limit, here are four different ways to share bigger files.
1. Resize an image
Yes, resizing only really works with images, but they are also more likely to go over the limit than .docx files, for example.
All images have a pixel size that you'll see as something like 1920×1040 if you look at the properties of the image. Reducing the size will also reduce the weight of an image.
However, if you have several images to send, it might be easier to archive them. If that’s the case, skip to the next step -- archiving.
How to resize an image on Windows
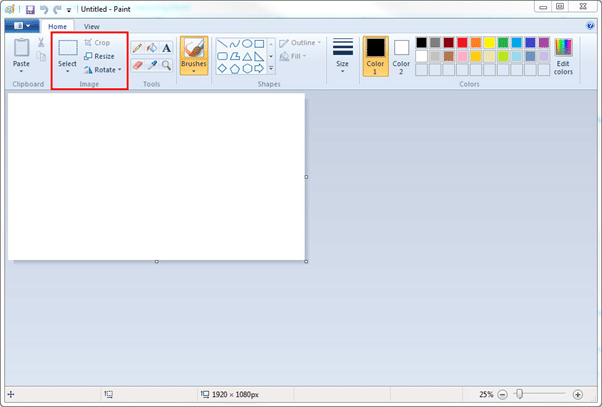
The easiest way to reduce the size of an image on Windows is to use one of Microsoft's staple products -- Paint.
- Launch the app and open the file you need or right-click on the file and click Open with... > Paint.
- On the second section of the Home toolbar, find and click the button, Resize.
- In the Resize and Skew window that comes up, type in the new pixel values that reflect the size you want.
- Alternatively, you can reduce the dimensions by a percentage.
How to resize an image on Mac
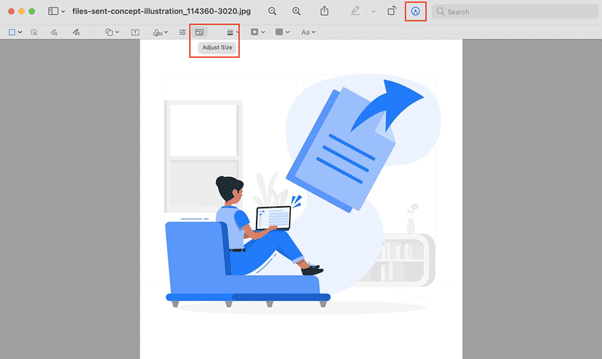
Mac has a Preview tool that allows for basic image manipulations, such as rotate, crop, and resize. To reduce the dimensions of a particular image:
- Open the image in Preview.
- Open the Markup Toolbar and click the Adjust Size button.
- In the window that opens, you can choose new dimensions:
- Fit into a particular size, such as 800x800, or
- Fit into custom dimensions -- choose width and height.
- In the field below the dimensions, you'll see the resulting size in pixels/in/cm and bytes.
2. Compress a file
Yes, compressing files is still a thing! In fact, the web relies on file compression to optimize bandwidth use. Compressing files reduces their size without affecting the quality or integrity of data, however, there's a limit to how far a file can be compressed.
With visual and audio formats, there are two types of compression:
- Lossy. With this type of compression, you sacrifice quality as this type removes the least necessary bits of information from a file. Some file formats, such as JPGs and MP3s, are lossy by definition.
- Lossless. With this type of compression, the quality is mostly sustained as it removes redundancy rather than bits of data. An example of this compression is when you save an image as a PNG instead of a PSD.
There are many tools for compressing different files. Here are a few examples:
7-Zip
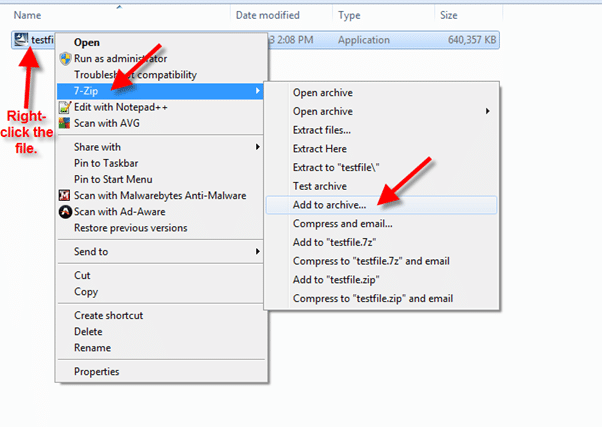
This is a free and open-source tool for compressing files into archives. You can download 7-Zip on Windows, Mac, and Linux. Once you install it:
- Choose a file or folder that needs to be compressed, or select several files and right-click on them.
- In the drop-down menu, click on 7-Zip, and then "Add to archive..."
- If you're experiencing difficulties, try the following configurations:
- Compression level > Ultra,
- Dictionary size > 10 times lower than your computer's memory, and
- Solid Block Size > Solid.
- Click OK once you're finished.
Note: if you don't know what unarchiving utility your recipient is using, select .zip in "Archive format."
Archive Utility on Mac
The Archive Utility comes pre-installed on Mac. By default, it compresses to a .cpgz format that offers a higher level of compression:
- Launch the Archive Utility via Spotlight Search.
- In the File menu, click on "Create Archive..."
- Choose the file(s) or folder that you want to compress and click the Archive button.
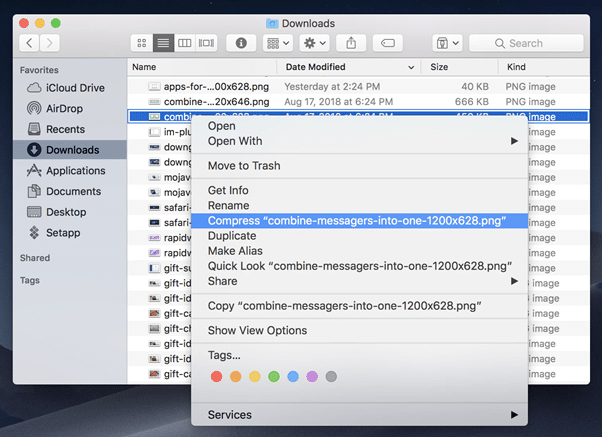
However, if your recipient is a Windows user, it’s better to archive as .zip. For that, you need to:
- Select the file(s) or folder that you want to archive.
- Right-click on the file and choose Compress.
KyLeads
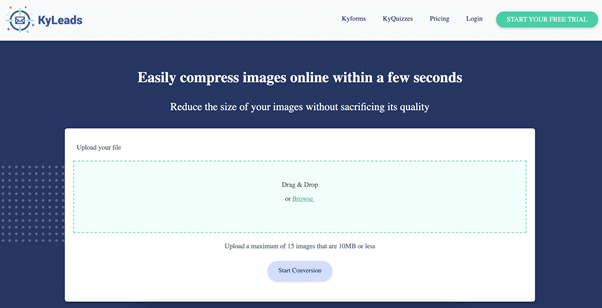
KyLeads has a web utility that allows you to compress up to 15 images of 10MB or less at a time. To compress the image(s):
- Drag and drop them into the upload file box and click on "Start Conversion."
- Once the conversion is complete, click Download.
- Alternatively, you can email yourself the archive.
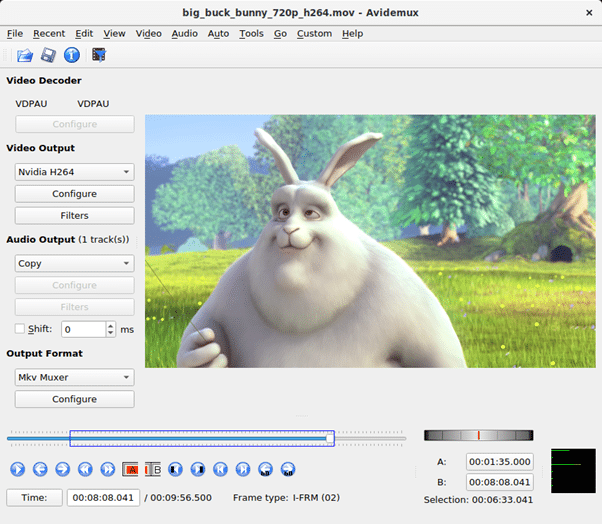
Avidemux (for videos)
According to several experts via Pearl Lemon, video is one of the top trends for SEO and content in 2021. A lot of businesses haven’t ventured much into this format, mostly because it requires a lot of technical expertise to pull off effectively.
If you’re just getting started, simply get a video up on YouTube. It’s simple to embed in lots of plugins from there. Naturally, getting started with YouTube is going to require having the right files. Online video maker platform PlayPlay, recommends you export your videos to YouTube in the file format MPEG-2 or MPEG-4.
So if you need to compress a video, try a video editing tool such as Avidemux. It's free, open-source, and works on various operating systems, including Windows and Mac.
However, if you have a few hundred MB worth of footage, you might want to skip to the next method. Otherwise, here's how to compress, or rather re-encode, a video file:
- Download and install Avidemux.
- Make a copy of the video you want to compress (you won't be able to revert the process).
- Load the video you want to compress via the menu File > Open...
- Select Mpeg4 AVC (x264) for Video Output, AAC FDK for Audio Output, and MP4 Mixer for Output Format.
- In Video Output, click Configure. From there, you can choose the Encoding Mode -- Video Size (Two Pass) -- and your target video size.
- Once all is set, click Save Video to initiate the conversion and compression process.
Audacity (for audio files)
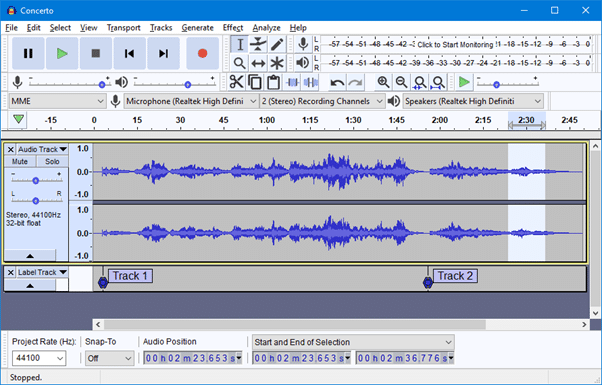
Compressing audio files works best with .wav and .aiff file formats. You can do that with Audacity -- free software for Windows and Mac. Once you download and install Audacity:
- Run the app and open your audio file.
- If it's a voice-only track, you can convert it to mono by choosing "Split Stereo to Mono" in the menu.
- Click on the File menu and choose Export > Export as MP3.
- Add a file name and select a standard quality, then press Save.
You could also export the audio as .flac or .ogg -- lossless formats. They result in better quality, however, not all apps and devices support such formats.
3. Save to cloud storage
Resizing images and compressing files doesn't always work, especially if the files are weighty, you have many, or both. For example, PST files with Outlook often have trouble compressing. Another limitation is how far you can reduce the size of a file before it becomes poor quality.
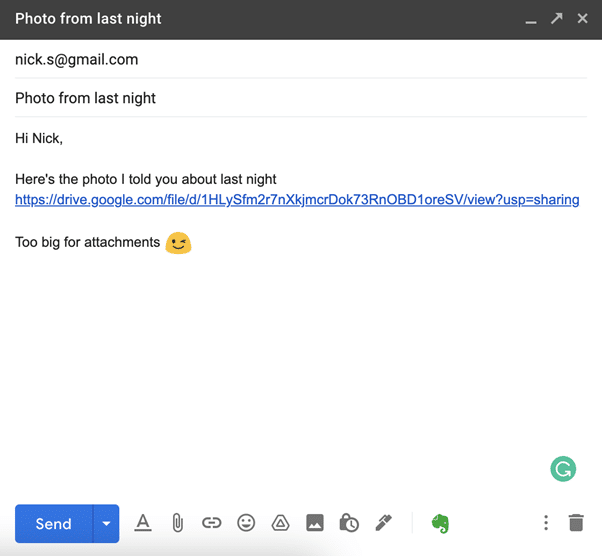
For larger images, videos, and audio files, it might be better to use cloud storage space. In this case, you upload your file(s) to a remote server where they can be stored for an indefinite amount of time. And instead of an attachment, you send a sharable link so it doesn't matter how big the file is.
Top cloud-storage apps
The apps in the list below can be integrated with web and desktop email clients, but there are many cloud storage spaces to choose from.
- Google Drive. This is a free platform that doubles as a storage space and office suite and is easily integrated with Gmail. You get 15GB to start with and the volume can be expanded for an extra fee.
- OneDrive. This is a Microsoft product and can be used as part of the MS Office suite and Outlook. You get 5GB of storage or 1TB if you upgrade to Microsoft 365.
- iCloud. This is a cloud service from Apple that works on all iDevices and Apple Mail. You get 5GB of storage for free and the volume can be extended for a fee.
- Dropbox. This is a cloud solution that integrates with most web and desktop email clients. A free Dropbox account will give you 2GB of storage and you can get 2TB for an extra fee.
Note: An email client can grant you more storage than a web-based email provider because files are not stored on a server, but in a place that can be backed up onto a harddrive or onto a cloud storage app. If storage is a real concern, seek out a Windows email client or Mac email client that allows integration with your prefered cloud-storage app.
How to send a file with a cloud-storage app
The process is pretty similar for all cloud storage solutions, not just the ones on the list above.
- Register for a cloud service of your choice (if you haven't already) and log into your account.
- Upload your file(s) by simply dragging and dropping them into the storage space. In some apps (like Drive or Dropbox), you also have a File Upload button.
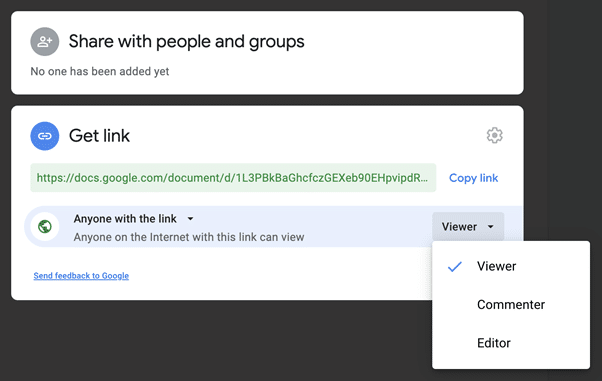
- Select your file(s) in the cloud and click the share button. Usually, it's a person icon with the plus sign.
- From here you will get a link that can be copied or shared straight from the cloud.
- Before you send anything, choose an access level for the file(s). You can, for example, restrict viewing or editing to specific accounts. In the case of apps like Dropbox, you can add a password to any file.
- After adjusting access permissions, copy the link and send it to your recipient.
4. Use a file-transfer service
The previous three methods all have certain drawbacks:
- The quality might be a concern.
- The file could still be too big for email, even after compression.
- Cloud storages have size limits.
- You might not want to store your files on the internet.
If this is the case, try a file-transfer service.
How does a sending service work?
For a lot of these services, you don’t even need to register. You just enter your email and the recipient’s email (or emails if you’re sending to a group), and upload your file(s) or drag and drop them into a designated field.
Tools for sending files without storing them in the cloud
- WeTransfer. This service allows you to send 2GB of information, in one go, for free. You can also sign up for a Pro account that gives you 1TB of storage and allows you to send up to 20GB at once.
- DropSend. A paid service that gives you 25 file transfers a month in the basic plan, but doesn’t restrict how many MBs of data you send in one go. You also get 10GB of online storage.
- Jumpshare. In the free version, you can send up to 250MB of data in one go. It also offers SSL sharing for better security. A basic paid plan will give you up to 20GB per transfer.
- Securely Send. Another SSL transfer service that allows you to send up to 2GB in one go. Paid members can further secure files with a password and enable read receipts.
Conclusion
The volume of data and speed of the Internet is ever-growing. The same can’t be said about email attachment limits though.
If you have an image or a video that exceeds the limit, you have four options to choose from. You can reduce the pixel size of an image or archive it. Alternatively, you can save it in a more lightweight format. And the same goes for video and audio files.
You don’t even need to attach anything at all. If your file is well over the limit, you can simply upload it to a cloud or file transfer service and email a link to where it can be downloaded.
Image credit: Rawpixel.com / Shutterstock
Roman Shvydun writes informative articles mainly about everything related to e-mail. His articles have become extremely popular in such areas as Marketing, Business, Productivity, Workplace culture, etc. His articles focus on balancing informative with SEO needs–but never at the expense of providing an entertaining read. See a few more examples of Roman’s articles by visiting the Mailbird blog.